Identifying Photographs in Your Family Collection
- Madison Holt
- Jul 10, 2025
- 9 min read
Updated: Apr 25
A picture is certainly worth a thousand words. Hopefully, some of those words help answer the questions of who, what, where, why, and when a photo was taken. But often, research can hit a dead end without these clues. This guide examines the qualities of early photography to help researchers begin to chronologically sort through their family photographs.
Early in photography’s history, the reason for having pictures professionally taken was the novelty of it. Later, as photography became cheaper and the Civil War began, photos became a precious memento of lost loved ones. The drastic differences between direct images and the digital pictures today makes it tempting to call everything before instant photography “old pictures.”
Direct Images
The first types of photographs available to the public were known as direct images. In these early processes, the exposure would produce a negative image of the subject — the highlights and shadows reversed — and further processing would make the image positive. The result being an image without an original, separate negative. Daguerreotypes, ambrotypes, and tintypes have similar subject matter, cases, and overall appearance, but subtle distinctions help differentiate the three.
Daguerreotypes
In Use 1839–1860, Peaked 1852–1854
Daguerreotypes were the first time a family could have their likeness captured without needing access to a portrait artist. Because of their reflective surface, daguerreotypes were called “a mirror with a memory.” Made of a copper plate coated in silver then buffed and treated with chemicals, a daguerreotype needed between 5 to 30 minutes of exposure to capture an image. Because subjects would have to sit for long periods of time, the posing in most daguerreotype portraits is stiff and expressionless.

The mirror-like surface can help to identify a daguerreotype. In the preparation process, the silver surface would have been buffed in one direction, and fine lines can often be seen in the background of a daguerreotype image. When in excellent condition, daguerreotypes can be difficult to differentiate from ambrotypes and tintypes. One way to quickly tell the difference when the image is in hand is to hold it at various angles. A daguerreotype image can only be seen from a few angles. Viewing it from an off angle produces a negative image.
Ambrotypes
In Use 1854–1865, Peaked 1857–1859
Ambrotypes are negative images on glass plates with dark material affixed to the back. That material could be black paint, varnish, lacquer, dark velvet, or any other medium that was readily available to the photographer. Ambrotypes were cheaper to produce because the glass plates did not need to be prepared as extensively as the silver-coated daguerreotypes, making ambrotypes more common. When in a case and in good condition, ambrotypes can be difficult to tell apart from cased tintypes.

Glass characteristics are a way to tell an ambrotype apart from metal daguerreotypes and tintypes. When glass breaks, it will have conchoidal fractures, which are cracks that make an arc shape. The highlights and shadows of the image are created on different levels, the front and back of the glass plate, so the highlights and shadows can appear to have a 3D effect when the ambrotype is tilted. This is in contrast to tintypes, which do not change appearance when viewed from the side.

Tintypes
In Use 1856–1930s, Peaked 1860–1863
With comparatively short exposure time and low cost, tintypes became a popular way for soldiers to take keepsake portraits of themselves before going off to war. Tintypes are made on iron plates, and they are named for the tin scissors used to cut photos apart. They were also known as melainotypes and ferrotypes, though ferrotype is the more well-known of the two. First patented in 1856 in Ohio, the tintype became a source of American pride. Images were so cheap to produce that thumbnail-sized tintypes were used on campaign buttons for the 1860 presidential election.

Tintypes are processed in the same way as ambrotypes, except a coat of dark varnish is applied to the front of an iron plate before exposure. After exposure, the image is sealed with clear varnish. While the shadows and highlights of an ambrotype are separated by a glass plate, the shadows and highlights of a tintype are combined. This can contribute to a tintype’s dull coloring. If not well preserved, the top layer of a tintype can flake off and expose the iron layer. Once exposed to the air, the iron will oxidize and rust. This kind of damage can be used to identify an image as a tintype. Outside of a case, a tintype will be cool to the touch and be a very dark color on the back.

Cased tintypes can have similar qualities to ambrotypes. The cases themselves will include a plate of glass which covers and protects the image. When glass is held over a tintype, the glass can make the tintype just as reflective and weighty as an ambrotype. Aside from removing the image from the case (which damages both the image and the case), tilting the case and viewing the image from different angles will help to tell the difference. Remember that ambrotypes’ highlights and shadows are separated by a plate of glass, so they shift when viewed from the side. Tintype highlights and shadows do not shift when tilted.
Direct Image Comparison Chart
Daguerreotype | Ambrotype | Tintype/Ferrotype | |
Material | Copper plate with silver coating | Glass plate with dark backing | Iron plate with layers of collodion and varnish |
Qualities | Mirror-like quality. Can only be seen at certain angles | Highlights and shadows on different planes. Holes in backing make the image transparent | Lightweight. When the image is damaged, the iron underneath begins to oxidize |
Made After | 1839 | 1854 | 1856 |
Hand-coloring
Nearly as soon as black and white photography was discovered, people began to experiment with color. For the artists who were concerned that photography would run them out of a job, they found colorizing portraits and landscapes to be a lucrative business. Even though people had never seen such a true rendition of life in photography, the lack of life’s true colors was less than satisfactory.
Some photographs are so painted that they blur the line between photography and painting. Typically, artists would use transparent paints or powdered pigments to add pink to cheeks and gold to buttons and jewelry. Landscapes to promote the National Parks utilized skilled artists to bring photos of nature to life. While Kodachrome color film was first available in 1935, color film was not widely affordable until the 1970s. Until then, color was added by hand.

Photography on Paper
As photographers continued to make improvements to their photographic processes, studios began to use glass negatives to transfer positive images onto light-sensitive paper. This brought the cost of photography down even further and increased its popularity. People began to keep photo albums that include photos of friends and family, celebrities, royalty, and works of art. Most of the prints from this era of photography are albumen prints — paper prints made from egg-white photosensitive paper and glass negatives — that are adhered to a cardboard surface.
Cartes de Visite
In Use 1854–1905
Cartes de visite (CDV) are small, trading card–sized prints mounted onto cardboard. They are about 2 ½ inches wide and 4 inches tall with a slightly smaller albumen photo attached. Some studios began to produce cards in which a thumbnail-sized tintype could be inserted into a slot and seen through a cutout. CDVs usually include a decorative frame around the image and the photographer’s logo on the reverse side. Carte de visite is French for “visiting card,” named so because guests would leave this card with a host after visiting with them. The small size and inexpensive cost made cartes de visite quite collectable, especially when celebrities and government officials began to produce images of themselves for sale to the public. People kept their collections in albums with pages that were perfectly sized to hold carte de visites. A photo album of CDVs may not be exclusively of family members and friends.

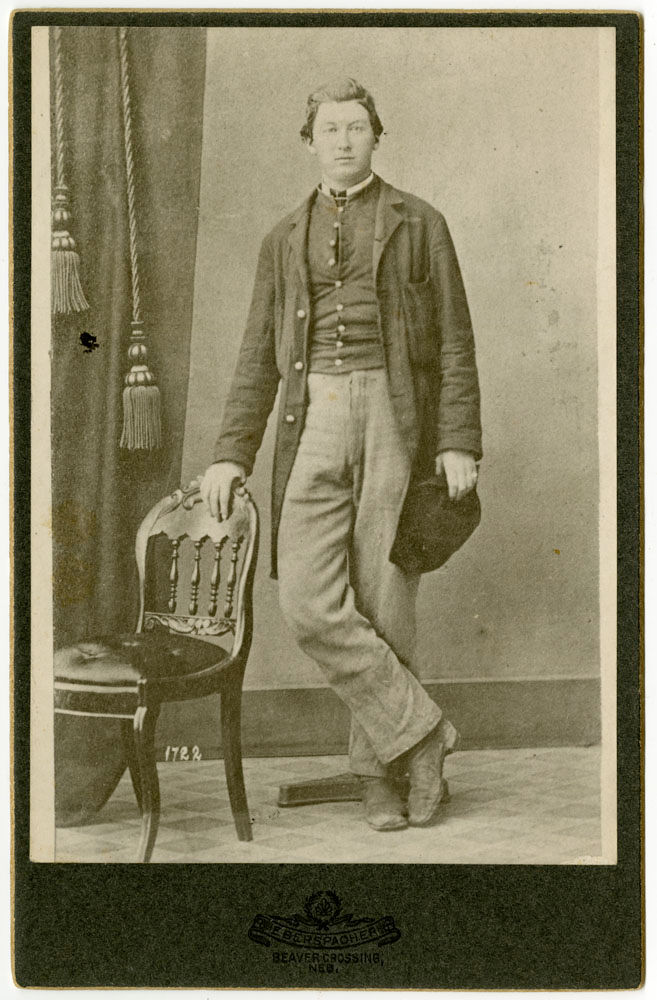
Cabinet Cards
In Use 1863–1920
Cabinet cards were made similarly to cartes de visite. While CDVs were kept in an album, cabinet cards were typically displayed in a cabinet in a drawing room or parlor. Cabinet cards are prints adhered to a thick piece of cardboard and were usually 4 ¼ inches wide and 6 ½ inches tall. Like CDVs, these could have decorative edges on the front and the photographer’s mark on either the reverse or the front. Photo albums also became larger to accommodate both cartes de visite and cabinet cards together. These were often portraits of people, but by the late 1880s, the subjects of cabinet cards shifted to those of art, travel, religion, and celebrities.
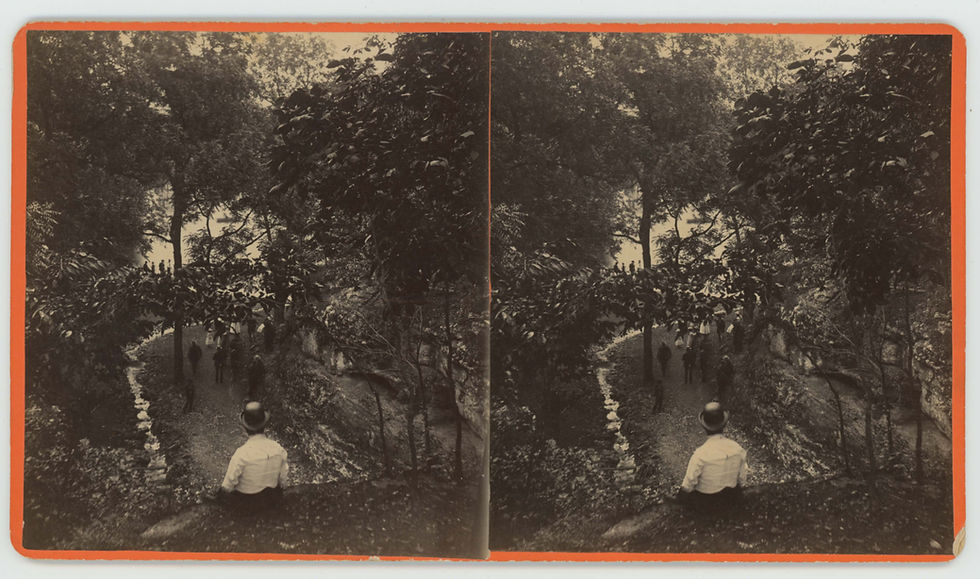
Stereographs & Stereo Views
In Use 1851–1925
Stereographs (also called stereo views) are easily identifiable by their two nearly identical images affixed side-by-side on cardboard. The reverse side often has information about where and when the stereograph was taken. Mainly for entertainment or educational purposes, stereographs are rarely images of everyday people. However, stereographs made for tourism reveal how people in the past spent their leisure time. The two photos were intentionally taken with a slight difference in position; the average distance between a person’s eyes. When seen through a stereoscope, an eyeglass-shaped device which helps the viewer to merge the two images, it would appear as one image with depth and dimension.
Knowing the approximate date range of a photograph is only one part of identifying the year a photo was taken. Other elements like people's clothing and hairstyles, the props and styling of the set, and textual elements like the photographer’s name or notes written on the back are also clues to the who, what, where, when, and why. If an ambrotype is labeled “Uncle John, 20 years old” but it is known that he was born in 1870, then it would be safe to assume that the ambrotype is a different John, or not a John at all.
The resources below dive deeper into each photographic type, among other topics like preserving family photographs, correctly identifying family members, and safely scrapbooking photographs. For dating photographs through clothing, see the reference guide Dressed for the Photographer: Ordinary Americans & Fashion, 1840 - 1900 by Joan Severa.
If you enjoyed this article, please consider making a donation to the Preserving Ozarks History Endowment. Each contribution supports Local History & Genealogy's mission of preserving the history and culture of the Ozarks.
Want more local history news and stories delivered directly to your inbox? Sign up for Local History & Genealogy's newsletter and email announcements.
For Further Reading
Mace, O. Henry. (1999). Collector’s Guide to Early Photographs. Krouse Publications.
National Portrait Gallery. (2016). Through the Looking Glass - Stabilization of an ambrotype.
Taylor, Maureen. (2001). Preserving Your Family Photographs: How to organize, present, and restore precious family images. Betterway Books.
Taylor, Maureen. (2000). Uncovering Your Ancestry through Family Photographs. Betterway Books.
U.S. Department of the Interior. (2020, Dec 18). Awash in Color: The Interior Museum’s hand-tinted photographs.